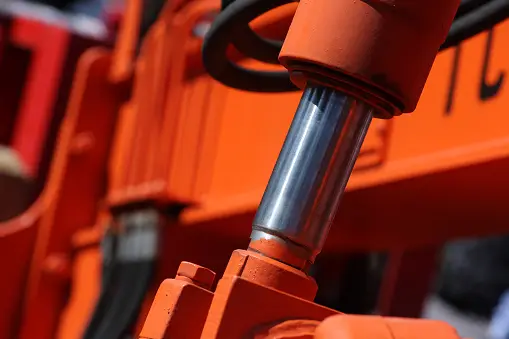
Rebuilding a hydraulic cylinder may seem daunting to many, especially if you’re not accustomed to handling such tasks. However, with the right tools, a bit of patience, and this comprehensive guide, you’ll find that refurbishing your hydraulic cylinder can be a straightforward and rewarding project. Here’s how to get started on your hydraulic cylinder repairs:
What You’ll Need to Rebuild a Hydraulic Cylinder?
Fixing a hydraulic cylinder is straightforward if you have the right items. Let’s make sure you know why each one is essential:
- A hydraulic cylinder rebuild kit
- Basic hand tools (wrenches, screwdrivers, etc.)
- Custom-made tool for disassembly (if required)
- Cleaning supplies (rags, wire brushes, etc.)
- Hydraulic oil
- Ether for cleaning
- Brass brush for gentle scrubbing
- Impact wrench (optional)
Gathering these items before you begin will make the rebuilding process smoother and more efficient. Each of them plays a critical role in ensuring your hydraulic cylinder is rebuilt to a high standard, ready to perform like new. Now that you know what you need, let’s delve deeper into this.
1. Hydraulic Cylinder Rebuild Kit
This kit is your starting point. Inside, you’ll find new seals and O-rings, crucial for stopping leaks and ensuring your cylinder operates smoothly. Think of it as giving your cylinder a new lease on life. These parts replace the old, worn-out ones that can cause problems.
2. Basic Hand Tools
Basic hand tools like wrenches and screwdrivers are your best friends in this project. They help you take apart the cylinder and put it back together. An impact wrench can be handy too, making it easier to loosen tight bolts and save you a lot of effort. Ensure you have a variety to fit different sizes and shapes of bolts and screws.
3. Special Tool (If Needed)
Sometimes, cylinders have parts that are hard to reach or open with standard tools. In such cases, you might need to make a tool. This could be anything from a custom wrench to a tool for gripping tight spaces. Making a tool might seem challenging, but it’s often about finding a creative solution to a problem, like using a piece of metal to fit exactly where you need it.
4. Cleaning Supplies
Clean parts work better and last longer. Rags, a wire brush, and cleaning solvents like ether are vital for removing old oil, dirt, and grime. A clean cylinder interior prevents future damage and ensures new parts fit perfectly. Think of it as preparing a clean workspace for your cylinder’s components.
5. Brass Brush
A brass brush is softer than steel brushes, making it perfect for cleaning without scratching or damaging delicate surfaces. It’s excellent for scrubbing away stubborn rust and dirt in sensitive areas, ensuring your cylinder’s parts are pristine before reassembly.
6. Hydraulic Oil
This oil is crucial for your cylinder’s performance. It lubricates moving parts, reducing friction and wear. When reassembling the cylinder, applying hydraulic oil to the new seals and O-rings helps them fit snugly without damage. It’s like the cylinder’s blood, vital for its operation.
7. Ether for Cleaning
Begin by spraying ether on the exterior of the hydraulic cylinder. This cleaning solvent helps dissolve old oil, dirt, and grime, making it easier to wipe away impurities. It’s like giving your cylinder a refreshing shower, removing years of accumulated debris.
8. Brass Brush for Gentle Scrubbing
A brass brush is your go-to tool for gentle scrubbing. Its soft bristles ensure that you can clean the surfaces without scratching or damaging delicate parts. Use it to remove stubborn rust and dirt, especially in those hard-to-reach areas.
9. Impact Wrench (Optional)
While not essential, an impact wrench can be a valuable addition to your toolbox. It simplifies the process of loosening tight bolts, saving you time and effort. If you’re dealing with particularly stubborn fasteners, an impact wrench can make your life a lot easier.
Read Also: What Is the Difference between Rubber Hose and Hydraulic Hose?
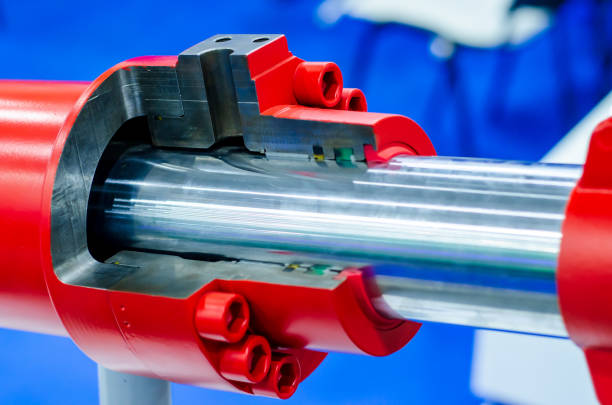
Disassembling the Cylinder
Disassembling a hydraulic cylinder is an essential step in the rebuilding process, requiring careful attention to detail and a methodical approach. Before you begin, ensure your workspace is clean and organized, with all the necessary tools and replacement parts within easy reach. This preparation is akin to laying out all the pieces of a puzzle before starting to assemble it, ensuring a smooth workflow without interruptions.
Start by thoroughly inspecting the hydraulic cylinder. Just like checking a bicycle for signs of wear or damage before a ride, examine the cylinder for any visible defects such as scratches, dents, or leaks. Identifying these issues early can help you understand the extent of the repair needed and whether any specific parts require extra attention or replacement.
In some cases, disassembling the cylinder might require special tools, especially if there are components that are tightly fitted or uniquely designed. If you don’t already have the necessary tool, you might need to make one yourself. This could involve crafting a tool from metal that precisely fits the parts you need to manipulate, similar to forging a key for a lock. This custom tool could be anything from a modified wrench to a specialized grip for loosening tight components.
Once you’re ready to begin, proceed to carefully open the cylinder. This process often starts with loosening and removing the end cap, which might be tightly screwed on. Using the appropriate tools, whether they are standard or specially made, gently but firmly unscrew the cap. This step can be compared to opening a tightly sealed jar, requiring patience and the right amount of force.
As you dismantle the cylinder, you’ll encounter various internal components, such as the piston and seals. Remove these parts one by one, paying close attention to their order and orientation. It’s crucial to remember where each piece came from, akin to noting the position of pieces in a complex game, ensuring you can reassemble the cylinder correctly.
Cleaning each part as you remove it is vital. Eliminating dirt, grime, and old oil not only makes it easier to inspect each component for damage but also prepares them for reassembly. Think of this as tidying up your space to not only create a pleasant environment but also to prevent future problems. Clean components function more effectively and are less likely to cause issues down the line.
After disassembling and cleaning, closely inspect each part for any signs of wear or damage. This meticulous examination is similar to assessing a used book for torn pages or a sports ball for scuffs—identifying these problems is crucial for ensuring the rebuilt cylinder operates flawlessly.
The process of disassembling a hydraulic cylinder, as detailed in the provided transcript, is not just about taking something apart. It’s a careful unraveling of the cylinder’s components, akin to dissecting a complex mechanism to understand and repair its inner workings. By following these detailed steps and paying close attention to the condition and cleanliness of each part, you set the stage for a successful rebuild that will restore the cylinder to optimal performance.
Read Also: Hydraulic Repair for Chilliwack’s Industrial and Agricultural Needs
Cleaning and Inspection
After disassembling your hydraulic cylinder, the next crucial steps are cleaning and inspection. This phase is like being a detective and a cleaner all at once. You’ve got to clean each clue (part) meticulously to see what story it tells about the health of your cylinder. Here’s how to approach this with depth and care:
1. Cleaning Thoroughly
Cleaning each component of the hydraulic cylinder is not just about making them look good; it’s about preparing them for a thorough inspection. Start with a general wipe-down to remove loose dirt and oil. Then, use your wire brush and cleaning solvents like ether to tackle the tougher grime and buildup. This process can be likened to preparing a canvas for painting; you want a clean surface to work on. For delicate areas or parts where a wire brush might be too harsh, switch to your brass brush. It’s softer and ensures you don’t damage any surfaces while still getting rid of rust and dirt. Imagine cleaning a precious artifact; you want to be thorough yet gentle.
2. Detailed Inspection
With your parts clean, it’s time to put on your detective hat. Inspect each component closely for any signs of wear, damage, or fatigue. Look for scratches, dents, or any irregularities on surfaces that should be smooth. This step is critical; it’s like examining evidence under a magnifying glass, looking for clues that might tell you what went wrong or might go wrong in the future. Pay special attention to the seals and O-rings, as these are often the first parts to show signs of wear. Check the piston and the inside of the cylinder barrel for scratches or scoring that could compromise the cylinder’s integrity and performance.
3. Verifying Component Integrity
As you inspect each part, assess whether it’s fit for reuse. Some components may only show minor wear and can be cleaned up and reused; others might need to be replaced entirely. This decision-making process is akin to assessing whether to repair or replace a vital piece of machinery. It’s about balancing cost with the need for reliability and performance.
4. Preparing for Reassembly
The final part of this phase is preparing the components for reassembly. This involves ensuring that every part you plan to reuse is not only clean but also free of any residue that could contaminate the hydraulic system. It’s also a good time to organize your workspace, ensuring that all the parts and tools you need for reassembly are within easy reach and properly arranged. Think of it as setting the stage for the next act in a play, where everything needs to be in its right place for the performance to go smoothly.
Cleaning and inspection might seem like the less glamorous side of rebuilding a hydraulic cylinder, but they are foundational to the process. By thoroughly cleaning each part, you ensure that your inspection is as accurate as possible. And by carefully inspecting each component, you lay the groundwork for a successful rebuild. It’s a testament to the adage that good preparation is key to success.
Read Also: What Makes Custom Webbing Straps Essential in Diverse Industries?
Replacing Seals and O-Rings
Once you’ve thoroughly cleaned and inspected each part of the hydraulic cylinder, the next step is to replace the seals and O-rings. This stage is akin to giving your cylinder a new suit of armor, ensuring it’s protected against leaks and ready to perform at its best.
The Importance of Seals and O-Rings
Seals and O-rings are the guardians of your hydraulic cylinder. They keep the hydraulic fluid inside, maintaining the pressure needed for the cylinder to work efficiently. Like the seals on a water bottle prevent leaks, these components ensure your cylinder operates smoothly without losing power. Over time, these seals wear out due to constant pressure and friction, leading to leaks and a drop in performance. Replacing them is like renewing a vow for optimal performance.
Selecting the Right Replacements
Not all seals and O-rings are created equal. They come in various materials and sizes, each suited for different operating conditions and fluids. It’s crucial to select replacements that match the original specifications. Think of it as choosing the right key for a lock; the wrong one won’t fit or work. Using your hydraulic cylinder rebuild kit, which contains all the necessary seals and O-rings, ensures you have the exact matches needed for your specific cylinder model.
Installation Tips
Replacing seals and O-rings requires precision and care. Before installation, lightly lubricate each seal with hydraulic oil. This not only makes them easier to install but also helps protect them from damage during assembly. Imagine dressing in layers for cold weather; you want each layer to fit snugly and comfortably without tearing. When installing the seals, use gentle pressure and avoid using sharp tools directly on them to prevent nicks and cuts. For O-rings, ensure they’re seated properly in their grooves, much like ensuring a lid is correctly screwed onto a jar for a tight seal.
Checking for Proper Fit
After installing the new seals and O-rings, double-check to ensure they fit perfectly. A properly installed seal should sit flush with its housing, with no twists or bulges. Think of checking the fit of a puzzle piece; it should slot in neatly without forcing it. This step is critical to prevent leaks and ensure the longevity of your rebuilt hydraulic cylinder.
The Final Check
With all the new seals and O-rings in place, you’re one step closer to completing the rebuild of your hydraulic cylinder. This process is not just about replacing parts; it’s about restoring the cylinder’s integrity and functionality. It’s the heart of the rebuild, ensuring that when you put everything back together, your cylinder will operate as efficiently as it did when it was new. Just like renewing the protective coating on a deck, you’re providing a fresh defense against the elements, guaranteeing that your hydraulic cylinder is prepared to face its operational challenges anew.
Read Also: Different Types of Hydraulic Fittings: A Guide for Professionals
Reassembling the Cylinder
Reassembling the hydraulic cylinder is the final and perhaps most satisfying step in the rebuilding process. It’s where all your careful preparation, cleaning, and inspection come together, like the final act of a play where every element converges to a fulfilling conclusion. Here’s how to approach the reassembly with precision and care, ensuring that your hydraulic cylinder is ready to perform optimally once again.
- Laying the Foundation:
Begin by organizing all the cleaned, inspected, and prepared components in your workspace. Like setting the pieces of a board game before starting, this organization ensures a smooth workflow without interruptions or the need to search for parts.
- Lubrication is Key:
Before fitting any parts together, lubricate them lightly with hydraulic oil. This lubrication acts as a protective layer, facilitating the smooth assembly of parts and reducing the risk of damage. Think of it as greasing a baking pan before pouring in the batter; it ensures that nothing sticks and everything moves smoothly.
- Careful Assembly:
Start the reassembly process by inserting the piston back into the cylinder barrel. This step should be approached with care, ensuring that the piston and the seals do not get damaged. It’s akin to threading a needle; it requires a steady hand and focused attention to detail.
- Seals and O-rings Placement:
As you reassemble, pay close attention to the placement of the new seals and O-rings. Ensure that they are seated correctly in their designated grooves and that they are not pinched or twisted. This is similar to placing a key into a lock; it needs to fit perfectly to function.
- Tightening Components:
Once all the internal components are correctly placed, proceed to reattach the end cap and any other external components you had removed. Tighten these according to the manufacturer’s specifications, ensuring a secure fit without over-tightening. Over-tightening can be likened to forcing a puzzle piece into the wrong spot; it might seem to fit, but it can cause damage.
- Final Inspection:
After reassembly, conduct a final inspection of the cylinder to ensure everything is in order. This is your last chance to catch any potential issues before the cylinder goes back into operation. It’s like reviewing an essay for any spelling or grammatical errors before submission; it ensures a polished final product.
- Testing:
If possible, perform a test of the hydraulic cylinder under controlled conditions to ensure it operates correctly. This test can reveal any leaks or performance issues that need addressing. Consider it a dress rehearsal before the main performance, allowing you to make any necessary adjustments.
Reassembling the hydraulic cylinder is a process that demands patience, precision, and attention to detail. Each step, from lubricating parts to the final tightening and inspection, plays a crucial role in ensuring the rebuilt cylinder operates efficiently and reliably. Like completing a complex puzzle, the satisfaction comes from seeing the individual pieces come together to form a fully functional and effective whole.
Read Also: Hydraulics and Pneumatics: Features, Differences, Examples, Advantages
How Much Does It Cost to Rebuild a Hydraulic Cylinder
Talking about the cost of fixing a hydraulic cylinder is like discussing how much it costs to build a LEGO set. The price depends on a few factors, such as the size of the cylinder, the parts required, and whether you do it yourself or hire a professional.
Delanges Industries, a trusted expert in hydraulic cylinder rebuilding, can provide professional services tailored to your needs. If you choose the DIY route, you’ll mainly need a rebuild kit, which can cost between $20 to $100 or more, similar to buying a new video game.
However, if you opt for professional help from Delanges Industries, the cost goes up because you’re paying for their expertise and time. Professional cylinder rebuilding can range from a few hundred dollars to over a thousand, depending on the extent of the repairs needed. Sometimes, you may discover additional worn-out parts inside, like the piston or rod, which would add to the overall cost.
To save money, it’s advisable to inspect the cylinder first, just like checking your pantry before going grocery shopping. So, the cost of rebuilding a hydraulic cylinder can vary widely, from a budget-friendly DIY project to a more expensive professional service with Delanges Industries, depending on your specific needs and preferences.
Wrapping Up
Rebuilding a hydraulic cylinder might seem like a big project, but with the right steps, anyone can do it. It’s all about taking it apart, cleaning everything up, swapping out the old parts for new ones, and putting it all back together. It’s a bit like fixing a bike or building a model airplane. You need patience, the right tools, and a bit of know-how.
If you’re feeling unsure or need specific parts, Delanges Industries is here to help, especially if you’re looking for hydraulic repair services in Chilliwack. We’ve got all the tools, seals, and expert advice you might need to make your cylinder as good as new. Whether you’re tackling this project for the first time or you’re an experienced pro looking for quality parts and services in Chilliwack, we’re here to support you every step of the way. Our team is dedicated to providing top-notch service and ensuring your machinery is running smoothly.
People Also Ask
How can I rebuild a hydraulic cylinder on a tractor?
To rebuild a hydraulic cylinder on a tractor, you’ll need basic tools, a rebuild kit, and some mechanical know-how. Start by removing the cylinder, disassembling it, replacing worn-out seals and parts, and then reassembling it carefully.
What’s the process for rebuilding a hydraulic cylinder on a John Deere machine?
Rebuilding a hydraulic cylinder on a John Deere equipment is similar to other hydraulic cylinders. Begin by safely disconnecting the hydraulic lines, disassembling the cylinder, replacing any damaged components, and then reassembling it following John Deere’s specific guidelines.
Do I need special skills to rebuild a hydraulic cylinder?
While some mechanical skills are helpful, you don’t need to be a professional mechanic. Many DIY enthusiasts can successfully rebuild hydraulic cylinders by following step-by-step instructions and safety precautions.
Where can I find the necessary parts and rebuild kits?
You can find hydraulic cylinder rebuild kits and parts at local hydraulic supply stores, equipment dealerships, or online retailers. Be sure to match the parts with the specifications of your cylinder and equipment.
How much time does it usually take to rebuild a hydraulic cylinder?
The time it takes to rebuild a hydraulic cylinder can vary based on your experience and the complexity of the cylinder. On average, it may take a few hours to a day for a DIY enthusiast, while a professional can complete the task more quickly.